
Read all the instructions before cutting!
Cutting instructions:
Cut (4) four 1 1/2"x 1/1/2" squares of light background fabric
Cut (2) two 2 1/4"x 2 1/4" squares of light background fabric for HST units
Cut (4) four 1 1/2"x 1 1/2" squares of medium fabric
Cut (2) two 2 1/4"x 2 1/4" squares of medium fabric for HST units
Cut (4) four 2 1/4"x 2 1/4" squares of dark fabric for HST units

Now pair the 2 1/4" squares of dark fabric with the 2 1/4" squares of medium and light background fabric. RST draw a diagonal line on the wrong side of the lighter squares.

Sew a 1/4" seam on both sides of the drawn line.

Cut in half diagonally once on the drawn line to make 2 oversized HST units.

Square the units to 1 1/2". I use Eleanor Burn's Quilt in a Day ruler for this purpose, but use whatever method you prefer. If you prefer not to oversize your blocks, cut the squares for the HSTs at 1 7/8"x 1 7/8".

Layout the units according to the block diagram and assemble. I collapse my seam intersections the way Jo Morton does, so refer to her books for how to do that. It makes the bulky seams in small blocks lay flatter.

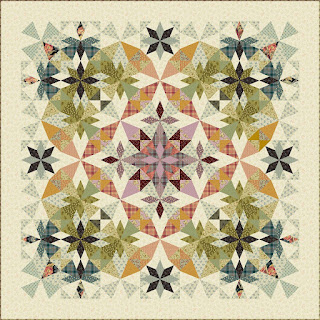
This is the miniature sampler I entered in the Arizona Quilters Guild show last year and won my first blue ribbon for. Pardon me blowing my own horn, but I am proud of it.

And this is what happens when the creative juices start flowing. I am like Edward Scissorhands. Thread and fabric just start flying. I don't stop to put anything away. If you look closely, you'll see fabric hanging off the book shelves and previous projects mixed in as well. I'll clean up now that the first block is done. I will try to post a block a week, perhaps more frequently. When I first start a project, I go gangbusters. Then once the design process is over, I go at a snail's pace.

P.S. if you find any errors in my instructions, let me know ASAP so I can correct them. Thanks and have fun!


What a gorgeous miniature, and well deserving of an award! I made a miniature a while back too, and loved making it.
ReplyDeleteI am thrilled to be your partner in the swap!
Micki
Your miniature quilt is beautiful and so deserving of the award. Thank you for the tutorial - I look forward to more blocks.
ReplyDeleteI'm in, too ;)
ReplyDeleteI am so glad that I found your blog. I have been a part of the Temecula Quilt Co. Mini BOM for a year now... and I'm really excited to see your Sew a Long!
ReplyDeleteI have to add that I am a Libra too... and an avid procrastinator as well!
The miniature sampler quilt is just gorgeous! Such strong colours.
ReplyDeleteThank you for the SAL, love the colours you're using. I'll rummage my stash for similar colours!
Thank you for the invitation Cheryl. I am resisting at this time as I have so much to do. But if time allows later..........
ReplyDeleteI will follow with interest and support.